1 Launch & Setup
GoCalc.AI runs as two parts: a desktop chat window and a lightweight HTTP server that runs inside Revit (2022 or above). Both must be active for AI commands to reach your model.
How the System Works
GoCalc AI Ribbon Tab in Revit
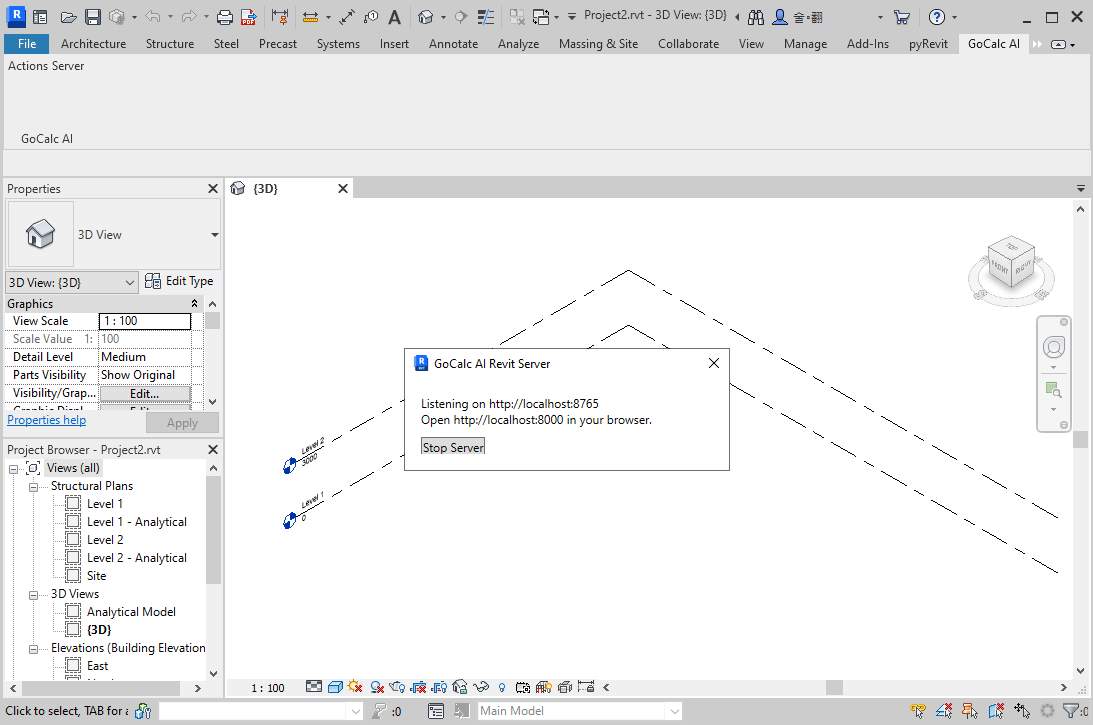
http://localhost:8765.Step-by-Step Launch
-
Open Revit (2022 or above) and load a project GoCalc.AI requires Revit 2022 or above with an open project. Any file works — a new or existing model.
-
Click "GoCalc AI → Server" in the Revit ribbon This starts the IPC HTTP server on port 8765 inside Revit. You must do this before opening the chat window. A status message in Revit confirms the server is listening.
-
Launch
GoCalc_AI_REVIT.exeDouble-clickGoCalc_AI_REVIT.exein the dist folder to open the chat window. No Python installation is required. If running from source, usestart.batorpython app.pyinstead. -
Add your API key via the Options dialog Click the Options button in the toolbar to open the Options & Configuration dialog. Enter your API key for at least one provider (OpenAI, Anthropic, Google, or Ollama) in the corresponding field and click Save. Keys are encrypted automatically — you never need to edit config files by hand.
-
Verify the connection The top bar of the chat window shows "Connected to Revit" in green when both parts are running correctly. If it says "Revit offline", restart the Server step.
-
Type your first command and press Enter Try: "What's in this Revit model?" — the AI will query your model and reply in natural language.
API key required. GoCalc.AI needs at least one AI provider API key to function. Click the Options button in the toolbar and enter your key before sending any messages. Supported providers: OpenAI, Anthropic (Claude), Google (Gemini), and Ollama. Keys are stored encrypted — they are never saved as plain text.
Start the Server first. If you open the chat window before clicking Server in the Revit ribbon, the status will show "Revit offline" and no commands will be executed. Simply click Server in the ribbon — the status updates automatically without restarting the chat window.
Revit 2022 or above required. GoCalc.AI uses the pyRevit IPC server which requires Autodesk Revit 2022 or a later version. Older versions are not supported.
2 Interface Overview
The GoCalc.AI window is divided into four main areas.
Left Sidebar — History
Saved conversations listed by title and date. Click any entry to reload it. Click × to delete.
Chat Area
Your messages appear on the right (green), AI replies on the left (white). Executed Revit actions are shown in a green log below each AI response.
File Preview Strip
Thumbnails of attached images and file badges appear here before sending. Click ✕ on any preview to remove it.
Composer
Type your message. Enter sends, Shift+Enter inserts a new line.
Toolbar
Buttons for attaching files, switching models, picking themes, and more.
Status Bar
Shows real-time connection state: Connected to Revit (green) or an error when the server isn't reachable.
Stop Button
While the AI is responding, a red Stop button replaces Send. Click it to cancel the response instantly and re-enable the input.
Toolbar Button Reference
| Button | What it does |
|---|---|
| 📎 Attach files | Open a file picker to select images, PDFs, or text files to include in your next message. |
| 🗑 Clear files | Remove all pending attachments at once. |
| ➕ New conversation | Start a fresh chat. The current conversation is auto-saved to the sidebar. |
| ⚡ Actions | Browse, test, and manage all available Revit actions. |
| ℹ About | View the version, disclaimer, and support contact details. |
| 🎨 Style | Open the theme picker to choose from 10 colour themes. |
| 🔌 Test API Keys | Verify that your configured AI provider credentials are working (hidden by default; enable in Options). |
| 📌 Always on top | Keep the GoCalc.AI window floating above all other windows, including Revit. |
| ⚙️ Options | Open the Options & Configuration dialog to set API keys, select the AI model, configure the Ollama endpoint, and toggle toolbar buttons — no restart required. Always the last button in the toolbar. |
3 Chatting with the AI
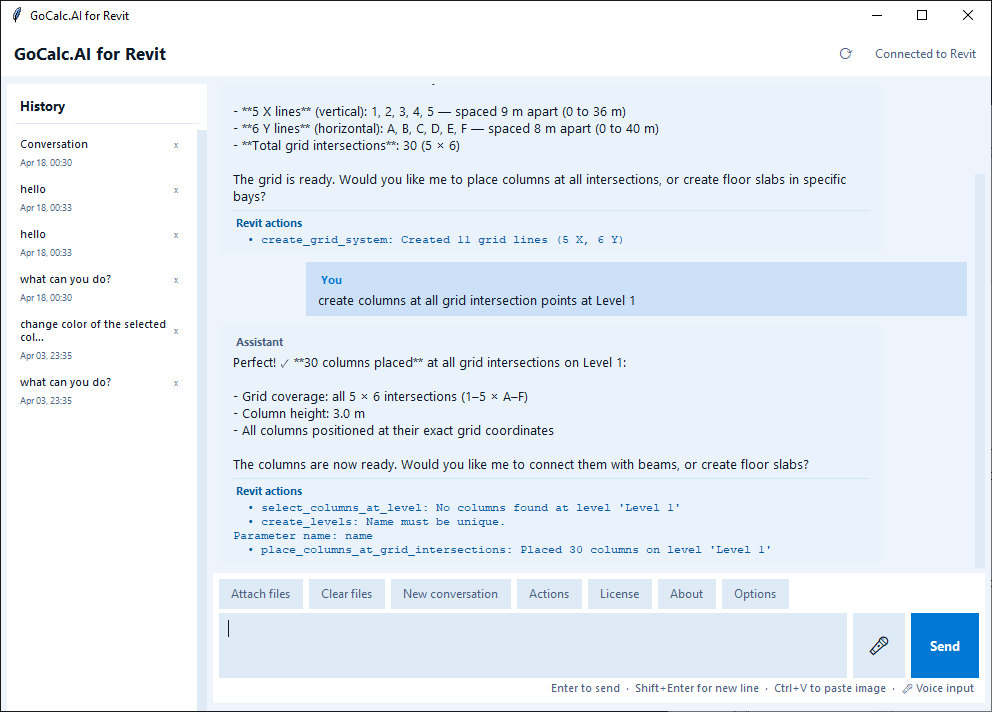
GoCalc.AI understands natural language. Describe what you want to do — the AI decides which Revit actions to call, executes them, and replies in natural language.
Example Conversations
What Happens When You Send a Message
-
AI receives your message Your text (and any attached files) is sent to the selected AI provider.
-
"Thinking…" indicator appears The AI processes your request and decides whether to call one or more Revit actions.
-
Actions execute inside Revit If actions are needed, they run via the server in real time. You'll see changes appear in your Revit model immediately.
-
Tool log is displayed Every action called appears in the green log below the AI reply (e.g.,
• place_columns_at_grid_intersections). -
AI replies in natural language The AI describes what was done, including counts, results, or any errors that occurred.
Always specify units. Say "5 metres" or "5m" rather than just "5". GoCalc.AI converts to Revit's internal foot units automatically — you never need to do that yourself.
4 Revit Actions
GoCalc.AI includes 30+ built-in actions that directly control your Revit model. The AI calls these automatically — you never need to name them explicitly unless you want to.
Project Information
| Action | What it returns | Example prompt |
|---|---|---|
get_project_info | Project name, file path, Revit version | "Tell me about this project." |
get_model_summary | Counts of walls, floors, columns, beams, grids, levels, doors, windows, rooms | "What's in the model?" |
list_views | All views in the model | "What views exist?" |
list_grids | Grid names and positions | "List the grids." |
Grid & Level Creation
Create Grid System
Places a rectangular grid. Specify rows, columns, and spacing in metres.
"Create a 5×4 grid at 6m spacing."
Create Levels
Adds new levels at specified elevations.
"Add levels at 0m, 3m, 6m, and 9m."
Wall Creation
Create Wall
Places a wall between two XY points with a height and level.
"Create a wall from (0,0) to (10,0), 3m tall at Level 1."
Create Walls on Grid
Automatically creates walls along all grid lines in the model.
Floor / Slab
Floor on Grid Bay
Creates a slab in a specific grid bay.
"Add a floor slab in bay A1 at Level 2."
Floor Slab at Level
Places a full slab at a given level.
"Create a 200mm concrete slab at Level 1."
Set Floor Thickness
Changes the thickness of an existing floor type.
"Change the Level 1 slab thickness to 250mm."
Column Operations
| Action | What it does | Example prompt |
|---|---|---|
place_column | Places one column at a specific XY location and level | "Place a column at (5,10) on Level 1." |
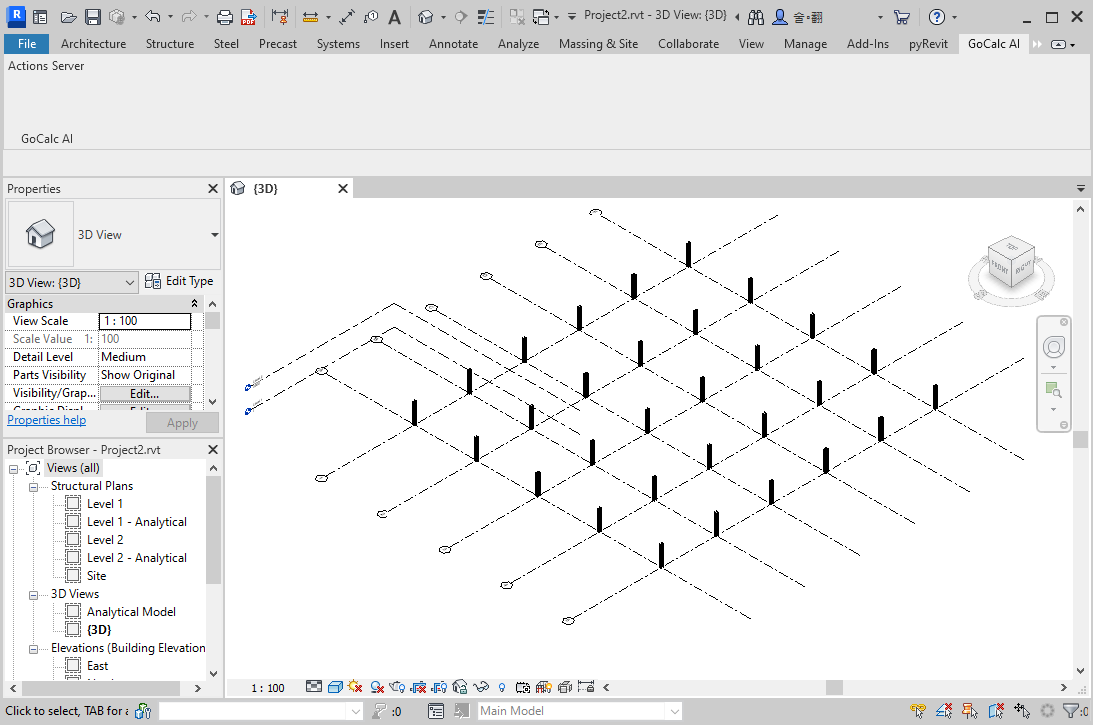
place_columns_at_grid_intersections | Places columns at every grid crossing at one level | "Place columns at all grid intersections on Level 2." |
place_columns_at_all_grids | Same as above but across all levels automatically | "Place columns at every grid intersection on all levels." |
create_concrete_column_type | Creates a new concrete column family type | "Create a 600×600 concrete column type." |
list_column_types | Lists all available column types in the model | "What column types are available?" |
change_column_type | Swaps the type on currently selected columns | "Change the selected columns to 500×500." |
adjust_selected_column_height | Changes the height of selected columns | "Make the selected columns 4 metres tall." |
Beam Operations
Place Beam Between Columns
Connects two selected columns with a beam. Select two columns in Revit first.
"Add a beam between the two selected columns."
Connect All Selected
Connects all currently selected columns with beams in one operation.
"Connect all selected columns with beams."
List Beam Types
Returns all beam family types in the model so you can reference them by name.
Selection & Counting
Annotation & Visualisation
Colour Selected Objects
Applies a colour override to selected elements in the active view.
"Colour the selected columns red."
Rotate Elements
Rotates selected elements by a specified angle.
"Rotate the selection 45 degrees."
Draw Circle at Column
Draws a detail circle annotation at a column location for markup purposes.
Data Export
Exports column data (location, type, level) to a CSV file in a folder you choose. "Export the column schedule to my Desktop."
Creating Custom Actions: If a built-in action doesn't cover your need, ask the AI to create one. For example: "Create an action that exports beam data to Excel." The AI will write and install the new action automatically — no restart required. Custom actions appear in the Actions Browser immediately.
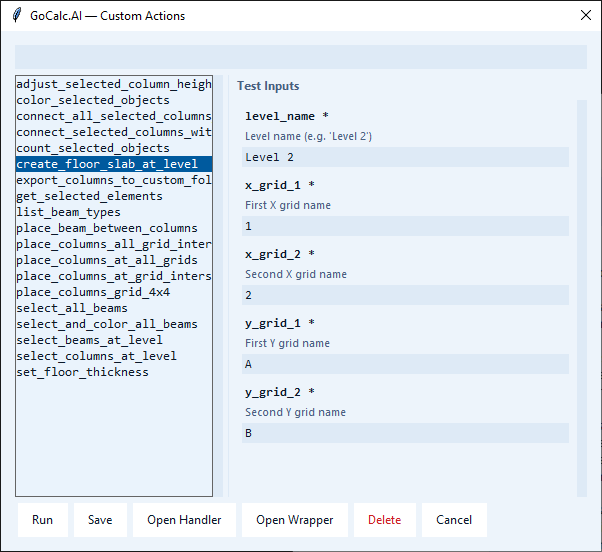
Actions Browser
Click the Actions button in the toolbar to open the full Actions Browser:
| Feature | How to use it |
|---|---|
| Search / Filter | Type in the search box to filter actions by name in real time. |
| Test Run | Select an action and click Test Run to execute it with its default test arguments. |
| Double-click | Double-click any action to immediately test-run it. |
| Delete | Remove custom actions you no longer need. Built-in actions cannot be deleted. |
5 Files & Voice Input
GoCalc.AI is multimodal — you can send images, documents, and spoken commands alongside your text.
Attaching Images
Paste from Clipboard
Press Ctrl+V anywhere in the chat window to paste a screenshot directly. Ideal for sharing your current Revit view without saving a file.
Attach Files
Click the attach button in the toolbar and browse for PNG, JPG, JPEG, BMP, GIF, or WebP images. You can attach multiple files at once.
Remove Before Sending
Each attachment shows a thumbnail with a ✕ button. Click it to remove that file before you send your message.
Take a screenshot of your Revit view, paste it with Ctrl+V, and ask "Does the column layout in this image look structurally correct?" — the AI will analyse the image and give you feedback.
Supported Document Types
| File Type | How the AI uses it |
|---|---|
| Reads the text content; useful for attaching specification documents or design briefs. | |
| CSV | Reads the data rows; useful for column schedules or coordinate lists. |
| TXT / MD | Reads the content as plain text. |
| JSON / PY | Reads the file as structured data or code. |
Voice Input
-
Click the 🎤 microphone button The button turns red and shows a stop icon (⏹). Speak your command clearly.
-
Click ⏹ to stop recording Your speech is sent to OpenAI Whisper for transcription.
-
Review and send The transcribed text appears in the composer. Edit it if needed, then press Enter to send.
Voice input uses OpenAI Whisper for transcription. An OpenAI API key must be configured even if you're using Claude or Gemini as your main AI model.
6 Conversation History
GoCalc.AI automatically saves every conversation so you can pick up where you left off or review past work.
Auto-Saved
Every message exchange is saved after each reply. You never need to manually save.
Reload Any Conversation
Click any conversation in the left sidebar to restore the full message history and continue from there.
Start New
Click New Conversation in the toolbar. The current chat stays saved in the sidebar.
Delete
Click the × button next to any conversation to permanently remove it.
Conversations are stored locally in conversation_history.json in the application folder. The sidebar shows each conversation's title (derived from your first message) and its creation date and time.
7 AI Models
GoCalc.AI supports four AI providers. Select your model in the Options dialog (⚙️ in the toolbar) — changes take effect immediately without restarting the app.
OpenAI (ChatGPT)
GPT-4.1, GPT-4o, o1, o3, o4-mini and more. Excellent all-around for Revit tasks and required for voice transcription (Whisper).
Anthropic (Claude)
Claude Opus, Sonnet, and Haiku. Excellent for detailed reasoning and longer, multi-step conversations.
Google (Gemini)
Gemini Pro and Flash models. Strong at image analysis and multimodal queries.
Ollama (Extended)
Kimi, Qwen3, DeepSeek, Mistral, Gemma, and 25+ more models for specialised use cases.
Not sure which model to use? Start with the default (usually GPT-4o or Claude Sonnet). Switch to a faster model like gpt-4.1-mini or claude-haiku for quick, simple queries to save time. Open Options → AI Model to change the model at any time.
Attaching images? Not all models support image input. If you attach a screenshot and the selected model does not support vision, GoCalc.AI will display a short error message asking you to remove the image or switch to a vision-capable model (e.g., GPT-4o, Claude Sonnet, or Gemini Flash).
8 Options & Configuration
Click the Options button (always the last button in the toolbar) to open the Options & Configuration dialog. All settings take effect immediately — no restart required.
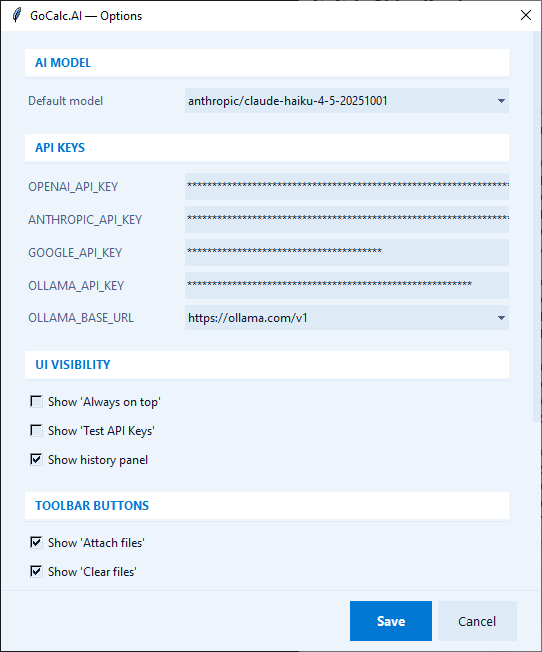
AI Model
Choose the active AI provider and model from the AI Model drop-down at the top of the Options dialog. The selection is saved to aimodel.json and applied to the current session right away.
API Keys
Enter / Update Keys
Type or paste your API key into the corresponding field (OpenAI, Anthropic, Google, or Ollama). Click Save and the key is encrypted before being written to aimodel.json — no plain-text keys are ever stored on disk.
Machine-Specific Encryption
Keys are encrypted using a key derived from your machine name and Windows username. The same aimodel.json file cannot be decrypted on a different computer. Existing plain-text keys in old config files are still recognised and continue to work.
Ollama Base URL
Select Cloud (ollama.com) or Local (localhost:11434) from the Ollama URL drop-down, or type a custom endpoint. This controls where Ollama API calls are sent.
| Provider | Field | Where to get a key |
|---|---|---|
| OpenAI | OpenAI API Key | platform.openai.com → API keys |
| Anthropic | Anthropic API Key | console.anthropic.com → API keys |
| Google API Key | aistudio.google.com → Get API key | |
| Ollama | Ollama API Key + Base URL | ollama.com account page (cloud), or leave key blank for local Ollama |
Toolbar Button Visibility
Use the checkboxes in the Toolbar Buttons section to show or hide individual buttons. Changes are written to config.json and the toolbar updates immediately without closing the dialog.
| Toggle | Controls | Default |
|---|---|---|
| Show Attach Files button | 📎 Attach files button | Visible |
| Show Clear Files button | 🗑 Clear files button | Visible |
| Show New Conversation button | ➕ New conversation button | Visible |
| Show Actions button | ⚡ Actions browser button | Visible |
| Show About button | ℹ About dialog button | Visible |
| Show Style button | 🎨 Theme picker button | Visible |
| Show Test API Keys button | 🔌 API key test button | Hidden |
| Show Always on Top checkbox | 📌 Always on top toggle | Visible |
Saving
Click Save at the bottom of the dialog to write all changes. The dialog closes automatically. There is no confirmation popup — the save is silent and immediate.
Advanced users can still edit aimodel.json and config.json directly with a text editor. The Options dialog reads and writes the same files — both approaches are compatible.
9 Themes
Click the Style button in the toolbar to open the theme picker. Your selection is saved automatically and applied every time you open GoCalc.AI.
The currently active theme is highlighted with an accent border in the picker. Click any swatch to preview and apply it instantly.
10 Keyboard Shortcuts
| Shortcut | Action |
|---|---|
| Enter | Send message |
| Click Stop | Cancel the current AI response and re-enable the input immediately |
| Shift + Enter | Insert a new line in the message |
| Ctrl + V | Paste image from clipboard into attachments |
| Click 🎤 then ⏹ | Start / stop voice recording |
| Double-click an action | Test-run the action in the Actions Browser |
| Click × in sidebar | Delete a saved conversation |
| Ctrl + Z (in Revit) | Undo the last AI-executed Revit change |
11 Tips & Best Practices
Always specify units
Say "5 metres" or "5m" rather than just "5". Unit conversion to Revit feet is automatic.
Use screenshots for context
Paste a Revit screenshot with Ctrl+V and ask questions about what's shown. The AI can see and analyse images.
Build models incrementally
Create the grid first, then place columns, then add beams — each as a separate message for best results.
New conversation for new tasks
Start a fresh conversation when switching to a different part of the project to avoid the AI being confused by earlier context.
Always on top
Enable "Always on top" so the GoCalc.AI window stays visible while you work in Revit — no alt-tabbing needed.
Query before you place
Use "List the column types" or "What levels exist?" before placing elements to confirm the exact names to reference.
Select in Revit first
For actions that operate on a selection, select the elements in Revit first, then ask GoCalc.AI to act on "the selected elements."
Request custom actions
If no built-in action covers your need, just ask: "Create an action that exports beam data to Excel." The AI writes and installs it instantly.
Switch models on the fly
Open Options and change the AI model mid-conversation. The next message you send uses the new model — no restart, no lost context.
Keep API keys secure
Always enter keys through the Options dialog — they are encrypted with a machine-specific key before being written to aimodel.json. Never share your aimodel.json file as it contains encrypted credentials.
Example Prompts to Try
Undo is your safety net. Because GoCalc.AI executes real Revit API commands, press Ctrl+Z in Revit to undo any AI-generated change you don't want to keep — exactly the same as undoing a manual operation.